
Do you run an online business? There is something called notification bars. You need it if you want to attract visitors to your website.
Your website users want to see what you are offering. With the notification bars on your website, you can showcase your new products or what your site is offering. So, you need to create easy notification bars to help you grab more users to look at your coupon codes, discounts, or new offers.
Those alert bars are the most effective marketing ways to help you boost your site’s traffic and revenue. A good grand audience will be useful for your business.
If you seek to create easy notification bars on your site, you are sorted in this article. A simple and effective process has been rounded up for you.
While you have an option to create the alert bars using codes, many plugins can help you to do so with ease. OptinMonster plugin is the best plugin that eases the process for you. It is easy to set it up and will save you time compared to other WordPress plugins.
How to Create Easy Notification Bars Through OptinMonster
You can create a website alert bar that matches the theme of your site.
Get OptinMonster Account
Begin the process by registering the OptinMonster account. Ensure you give your correct email. Once you are done, you can proceed to provide your password. That is a simple registration process to open an account. You now have the account, and you are allowed to log in for other steps.

Create a New Campaign
The next step is to create a new campaign. Look at the top right-hand section on your dashboard after logging in. Just proceed to click the “Create new campaign” button. Ensure the page you are on appears like the one below.

Select the Floating Bar Campaign Type
The page has several campaign types. You are supposed to select the floating bar type by clicking on it. It will help you to convert subscribers without affecting their browsing experience.

Pick Your Notification Bar Template
When you have made your choice of campaign type, the next step you are supposed to undertake is to select your notification bar template. OptinMonster offers you many options. You can pick out the one that fits your site.
While the alert template is bright red, you are allowed to change it to match your website colors and brand. Colour is very important, and you need the one you believe will appeal to those who visit your website.
You may not find a notification bar template that suits your brand. But that doesn’t have to leave you worried. You can come up with your website notification bar from scratch. Once you create it, you can tailor it to shape your goal.

Give Time to Your Campaign and Select the Websites
This is another crucial step as you try to create easy notification bars on your website. If you are done with the templates, move to the next step. That is, naming your campaign. You need to ensure you pick a name that suits your brand and website.
Go on and pick the websites that you would like to add the campaign to. You are allowed to add many websites and apply the same notification bar on those websites. Ensure you are operating on a page that looks like the one below

Edit Campaign Settings
Have you followed all the above steps and done as required? You will be directed to OptinMonster edit. It will allow you to modify various settings. They include.
1. Location of the Notification Bar
Your alert bar needs to be located in an appropriate position so that it won’t interrupt your visitor. Also, placing it in a good position makes it easy for your web users to recognize it.
So, to adjust your alert bar position, you are supposed to navigate your way to the “floating setting” and switch on the toggle button. You will find it on the front of the floating bar at the top page.

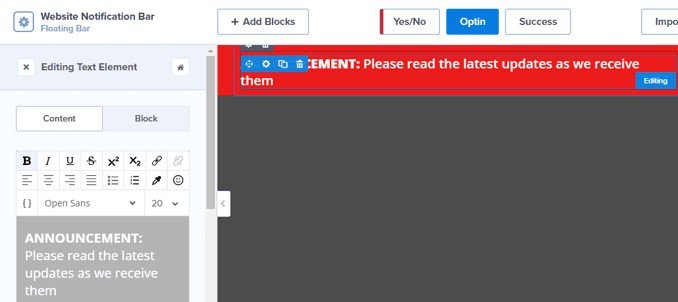
2. Text of Your Campaign
The next thing you are required to change is the content for your campaign. Come up with content that suits your brand if you seek to attract more traffic.
All you need to do to change the text is click on the one you wish to edit. An editor will open, and you can create your desired text.
3. You Can Change the Button of the Campaign
In case you want to change the button text, you can do that with a simple click on the button you want to modify. You can change the icon spacing, icon, color, alignment, and width.

Ensure you adjust your action URL of the campaign from the button settings.

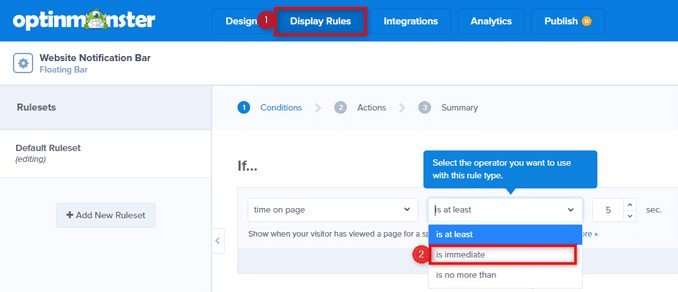
4. Adjust the Display Rules
This option offers you a better way to target your customers. Visit the “display settings. You will see that option at the top of your OptinMonster dashboard menu.
Adjust the time on the page to immediate. At the same time, it may appear small change. It will help to improve user experience with your website alert bar.
Saving Your OptinMonster Campaign
Once you completed all the steps, click the save button.

Take Your Last Step that is to Publish the Campaign
You’re now on the final step to creating easy notification bars on your site. After clicking the publish button, go on and switch on the toggle to make your campaign live.
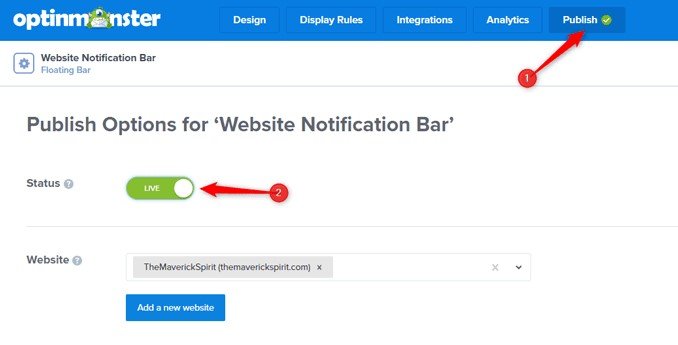
You are now done with the steps to create easy notification bars and your site. But ensure after you have hit the publish and live button, it looks like the image below on your website.

Conclusion
You need to create easy notification bars for your website. They will aid you in drawing more people. With those alert bars, they can quickly check what you offer. Follow the above simple steps, and you will make it with ease.